Friendly Reminder: Don’t use platform defaults

tl;dr

Don’t use platform defaults as they may not be the same across all machines, especially when sending data in between them.

Microsoft has a big warning section in the Encoding.Default property docs about this.

The story

A few years ago we built web service so we could centralize common configuration settings like connection strings, etc. This way, all of our apps could hit the service to get the latest configuration settings without us having to change them everywhere.

At some point, we decided to put a little more oomph into the security of it. Now we have a little bit of crypto going on to make sure requests are authorized.

I’m building a new service based on the .NET Core platform and I copied over our client code to see if I could get it going. It compiled fine, but started throwing exceptions on the crypto bits complaining about the key not being the right size.

After a bit of debugging, I noticed this bit of code:

static byte[] _bytes = Encoding.Default.GetBytes("blah blah blah");

Sure enough, when running on the core framework, we get a different encoding than on the full framework.

Unfortunately for us, this issue is in a central portion of our services. Everything communicates with this service and this issue is in the code used for communication 🙁

The quickest change we could make would be to use codepage 1252 as our encoding in our new apps, but this leaves us with the issue of being the mercy of the default value. We can’t move that service ever, unless we can guarantee that the default is the same as before.

Another change we should make would be to commit to codepage 1252 explicitly in code. This would at least get rid of the being dependent on platform defaults.

Any other changes, like using UTF8 instead, would certainly involve a lot more work. Since everything communicates with our config service, we can’t just replace it without rolling out new versions of everything at the same time and I’ve never been a fan of big rollouts.

If we do decide to do a big change, we’ll roll out another service with the fix side by side with the old one. Then we can update our other services as needed.


Posted in Azure, C# | Leave a comment

Get Azure Functions 2 Preview Up And Running On OS X With C# Functions

** This is what I encountered as of April 16, 2018 so this may no longer be accurate. Also, note that this is for the preview version.

tl;dr

Finally after much frustration and a bit of luck, I got something working. In order to document my journey to running code, I needed to figure out where some dotnet project and item templates came from. These templates had been installed by VS Code when I opened one of my many attempts when it recommended them. I wasn’t paying attention, so I had to find out where they came from 🙂

Googling for ‘dotnet new “azureFunctionsProjectTemplates”‘ resulted in a single link.

That link contains the instructions on how to install the item and project templates as well as how to create, build and run a new project.

Once the templates are installed, the build and run portion looks like this

$ mkdir funexample
$ cd funexample/
$ dotnet new "Azure Functions" -n funexample
$ dotnet new HttpTrigger -n get
$ dotnet build
$ func start --script-root bin/Debug/netstandard2.0/

You might need to adjust the version of the Microsoft.NET.Sdk.Functions package reference in your csproj file to match whatever version of the SDK that you used to install the templates.

I had planned on writing out a much longer version of how I got things running, but I’m not.

I really wished that I knew what magic combination of keywords would get me to that link earlier today. Hopefully I’ve written the title of this post so that other folks can find this and then head over to that link 🙂

Posted in Azure Functions, C# | Leave a comment

Disappearing Azure Data Lake Files?

tl;dr

If you upload files from the Azure Data Lake Explorer in Visual Studio, it will set an expiration time on the uploaded files. That expiration time looks to be about one week from the upload time. Once that time has passed, the file will disappear.

Since there’s no option in the current Azure Data Lake Explorer in the Visual Studio tooling to change the expiration time or prevent it from setting it, you probably should avoid using it to upload files for now unless this is what you want.

If you’re using the Azure Data Lake Tools in Visual Studio Code, uploads from there do NOT set an expiration on uploaded files.

Want to see this changed? Vote on the User Voice

The rest of the story

Yesterday, a friend pinged me to ask if I’d ever seen files just up and disappear from an Azure Data Lake Store.

“Uhh, what…” was basically my response.

According to them, they’ve observed some U-SQL scripts they were storing on the data lake, just vanish.

At first, they thought someone was being careless, but that turned out to not be the case.

They even went and created a case with Microsoft about this because their Data Factories depended on those scripts. In the current state those Data Factories were failing causing all kinds of issues.

I’ve never seen this problem before, so I was at a loss. I reached out to a couple of online resources I had access to, but no one had seen this issue before.

A little while later, then pinged me again saying they found the culprit. It was how they were uploading the files from Visual Studio.

Currently, the Azure Data Lake Tools in Visual Studio will add an expiration time of about one week to any file it uploads.

There is no option to change or disable the expiration on upload.

We then tested using Visual Studio Code on OS X using the Azure Data Lake tools there. Uploads from those tools did not set and expiration time.

I can see reasons why you might want to set expiration on files, but for the tooling to force it with no option to disable it from the tooling is just plain wrong.

Posted in Azure, Data Lake, U-SQL | Leave a comment

Friendly Reminder: GetHashCode Isn’t an Identifier

tl;dr

Don’t use GetHashCode to identify an object. Microsoft has a big warning section in the GetHashCode docs about this.

The story

We store around 70 million unique objects in Azure Table Storage and we access them through an API that we built.

Our API takes in a list of object identifiers and returns those object from table storage if they exist.

In order to get the performance we wanted, we partition the data based off of the object’s identifier and use the identifier as the row key. Our table looks a bit like this

PartitionKey (generated) RowKey (object’s id) Data
0000000192 123456 I have data
0000000182 123457 me too!
0000000156 123458 yay! data

We we try to access the data, we query with the generated partition key and the object’s identifier as the row key.

To generate the partition, we have code that looks like this:

static int numberOfPartitions = 1000; 
public static string GeneratePartition(string id)
{
  // we can have 1000 partitions
  var partition = (Math.Abs(id.GetHashCode() % numberOfPartitions)).ToString();
  return partition.PadLeft(10, '0');
}

And this is where we ran into trouble.

This week I’m moving some of our services from one Azure subscription to another, so I’ve had to create new resources to create, update and access the data.

Everything was running fine. The logs looked good, other files generated in the process looked right, then I tried accessing the data through the API.

No Results.

I couldn’t get results even when running the API locally. I could see the data in Azure Storage Explorer. But the data didn’t match up.

After a couple of hours poking and prodding, I found the issue by picking a partition/row key pair that I knew existed. With that, I stepped through the code and lo and behold, my code was generating a completely different partition key.

The easy “fix” was to setup the app service just like the existing service. The difference between the 2 was that the existing app was 64 bit, the new one was 32 bit. Flipping that switch made it run properly.

While that got it running now, the better fix will be to update the code to not rely on GetHashCode.

Posted in C# | Leave a comment

U-SQL – Extracting Information From a Column Containing JSON

There are plenty of examples on how to parse JSON files using U-SQL, but what if one of the columns of a TSV contains JSON like this example:

ID  Name  Vehicle 
1   Joe   "{""Year"":""2017"",""Make"":""Ford"",""Model"":""Fusion""}"
2   Bob   "{""Year"":""2016"",""Make"":""Kia"",""Model"":""Sorento""}"

We can adapt an example of Using the JSON User Defined Functions from the Microsoft.Analytics.Formatting.Samples.Formats library in the U-SQL Examples repository on GitHub.

Once we’ve built and registered the assemblies, the script is rather straightforward.

First up, we need to reference the assemblies we just registered.

REFERENCE ASSEMBLY [Newtonsoft.Json];
REFERENCE ASSEMBLY [Microsoft.Analytics.Samples.Formats]; 

Next, we’ll extract the raw data

@rawData =
    EXTRACT Id int,
            Name string,
            JsonString string
    FROM "/file_with_json_column.tsv"
    USING Extractors.Tsv(skipFirstNRows:1);

In this next bit, we’ll use the JsonTuple function from the Microsoft.Analytics.Samples.Formats library convert the JSON string into a dictionary. Once we have the dictionary, we’ll pull values out of it.

@rawDataWithTuple =
    SELECT Id,
           Name,
           Microsoft.Analytics.Samples.Formats.Json.JsonFunctions.JsonTuple(JsonString) AS JsonTuple
    FROM @rawData;

@expandedData =
    SELECT Id,
           Name,
           JsonTuple["Year"] AS VehicleYear,
           JsonTuple["Make"] AS VehicleMake,
           JsonTuple["Model"] AS VehicleModel
    FROM @rawDataWithTuple;

Finally, we’ll output the expanded data so we can check our work.

OUTPUT @expandedData
TO "/expandedData.tsv"
USING Outputters.Tsv(outputHeader : true);

The full script and a sample file can be found here.

Posted in Azure, Big Data, JSON, U-SQL | 2 Comments

Using Azure Functions to Replace Cloud Workers

When looking at options for replacing Worker Roles in Azure Cloud Services, more and more, Azure Functions look to fit the bill.

I like the idea of just writing code that focuses on what needs to be done and not having to write plumbing code like polling a queue, handling parallel execution or dealing with poison messages.

With Azure Functions, you can trigger your code using blobs, event hubs, queues, timers and web hooks.

Now that Azure Functions can run on Linux and in a Docker container, we can deploy it however we want.

The idea is this:
– Use Azure Functions as the base image of my workers
– Each worker will handle one message type
– Create a Docker image for each worker
– Deploy them to a Kubernetes cluster so they can scale independently

To explore this idea, we’re going to build a small proof of concept.

A text file will get dropped in blob storage container, which will trigger a function that will verify that it has contents.

If it does, another function will read the file and split it by line and save each line into separate files.

High Level Process

Once the split is done, work will queue up for the another function that will uppercase the contents of each new file.

High Level Process Part 2

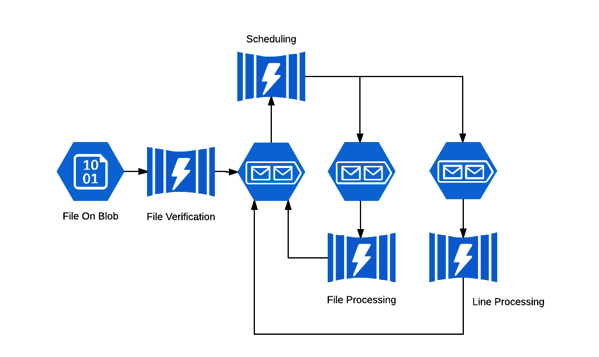
All of the functions described so far will not enqueue work for other functions. That will be left to yet another function that will handle scheduling of work.

The overall architecture should look something like this:

High Level Architecture

I should mention that while I’ve used some of these technologies before, some of this is still new to me.

This feels like it should all just work together nicely, but I haven’t really dug in to it yet.

Either way, this will be a bit of fun in figuring out if this is viable or it crashes and burns 🙂

In the next post we’ll take a crack at designing/implementing the first function, the scheduler.

Posted in Azure, Azure Functions | Leave a comment

Repost: Filtering columns out of data using Azure Data Factory

At work, every night we ingest a couple of large comma separated files (CSVs) that are 45 to 50 GB each. These files are generated externally, so we don’t control what information is in them. For our purposes, we really only need maybe 10 of the 50 or so columns in each file.

In order to reduce the size of the files coming in, we’re using Azure Data Factory to filter out the columns that we don’t want.

Let’s suppose that we have a CSV that looks like this:

Id Name Website
1 Apple apple.com
2 Google google.com
3 Microsoft microsoft.com

And what we really need are just the Id and Website columns:

Id Website
1 apple.com
2 google.com
3 microsoft.com

Azure Data Factory makes this relatively easy.

The first thing we need to do is to create datasets for our input and output files. When we create the datasets, we need to define the structure of each file.

The structure section for our input file will look like this:

"structure": 
[
  { "name": "Id", "type": "int" },
  { "name": "Name", "type": "String" },
  { "name": "Website", "type": "String" }
]

The structure section for our output file will look similar to our input structure, but we’ll omit the “Name” column

"structure": 
[
  { "name": "Id", "type": "int" },
  { "name": "Website", "type": "String" }
]

The last part we need to have Data Factory filter out that column is to use a translator in the Copy activity of our pipeline.

{
  "type": "Copy",
  "typeProperties": {
    "source": { "type": "BlobSource" },
    "sink": { "type": "BlobSink" },
    "translator": {
      "type": "TabularTranslator",
      "columnMappings": "Id: Id, WebSite: WebSite"
    }
  },
  "inputs": [ { "name": "InputDataSet" } ],
  "outputs": [ { "name": "OutputDataSet" } ]
  ...

In the columnMappings property you set which input column maps to which output column. In our case, they are named the same in both the input and output datasets. The format for the columnMappings value is

"inputcolumnX: outputColumnY, ..."

What’s really nice about this is that you can use this on more than just files. In our pipeline, we’re also using this to map results of an HTTP request to a CSV format.

Posted in Data Factory | Leave a comment

Whoops, starting over (or why you should really keep your contact info up to date)

Last year, I started blogging again. Nothing major, just tidbits from things I struggled with at work or found interesting.

Back in September, my hosting at dreamhost expired, they sent out warnings and I never got them.

It’s not their fault. I’m the idiot that stopped checking the email account I had listed as my primary email.

That was back in September, it’s December now. I’ve gone back in and re-enabled my hosting, but all of my previous content is gone.

Oh well.

The moral of this story is to make sure that your contact information is up to date, especially where it counts.

Leave a comment